Excel: Format Phone Numbers with Brackets and Hyphens

This week I bring you the solution to a problem that was brought to me by someone very frustrated in dealing with a Microsoft Excel spreadsheet full of phone numbers. She was looking to use the phone numbers to create a directory using the mail merge feature in Microsoft Word. Unfortunately, the phone numbers were all formatted incorrectly for what she needed. Every number appeared without any brackets or hyphens.

She had numbers like this: 5555558173
But wanted numbers like this: (555) 555-8173

You can have Excel add in those brackets and hyphens automatically. You will want to use a combination of CONCATENATE, LEFT, MID, RIGHT, and TRIM.

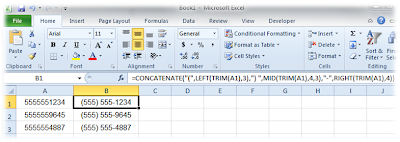
For this example, I'm assuming that your first phone number is in cell A1, and you would like it to be formatted correctly and appear in cell B1. In cell B1, you are going to want to enter the following formula:

=CONCATENATE("(",LEFT(TRIM(A1),3),") ",MID(TRIM(A1),4,3),"-",RIGHT(TRIM(A1),4))

Here's a screenshot of what it will look like (click to view a larger version):


That's it! Of course, this is for the specific style of phone numbers that we use here in North America. You might very well need to adjust your concatenate formula if you are using a different format.

Not quite sure how concatenation works? Click here to read a previous post I made, which should help clear up any confusion you might have on the topic.
Read More

Excel: Prevent Printing of Specific Objects

Sometimes there's stuff that you want displayed on screen while using a Microsoft Excel spreadsheet, but you don't want it appearing on printouts.

For example, I use a budgeting spreadsheet that has a number of text boxes with reference text for use while filling in information. I don't want all of that to show up when I print out the budget, though. I also don't want to have to move them outside of the print area, or perhaps delete them temporarily.

Objects such as text boxes, shapes, and pictures all have a setting which dictates whether or not it will print. By default, objects will print. You can go in and change this.

First, you need to bring up the properties. If it's a text box or other shape, right-click it and select 'Format Shape...'. If it's an image, right-click it and select 'Format Picture...'.

From the options on the left-hand side, choose 'Properties' (it's the third from the bottom). Uncheck the checkbox next to 'Print object'. Click the 'Close' button when you're done.

If you ever want the object(s) to print once more, simply repeat those steps and place a checkmark back in that same checkbox.
Read More

Excel: Show Initial Text in Combo Box Control ('Select One')

Want to see some initial guiding text such as 'Select one' for a combo box? You'll see some people suggesting that you add that as an additional list item, but I don't really like that approach. It's a bit sloppy because in reality, it's not really an item in the list. You don't want the user to choose "Select one". You want them to actually follow the instructions and make a choice, right?

As with most things in Microsoft Excel, there are a number of different approaches for seeing the same results, but I'm going to show you the way that I like to do this. I've made a very basic little form so that you can see how it looks. Take a look at the combo box for 'Province/Territory'. See how it says 'Please select one'?


Now, see how that text becomes invisible once you make a selection?


When the user clears the text from the combo box, the 'Select one' text will appear once more, as in the first image.

First what you're going to want to do is enter your 'Select one' text into the cell that is directly behind the control. In my case, I've put it in cell C6. Due to the way I've styled this particular form, I've also given that cell a white fill to match the controls. If you haven't sized everything to follow the rows and columns, you might need to actually put this in as a text box behind the combo box. Whatever works best for you will be okay.


Now, make sure the BackStyle property of your combo box is set to '1 - fmBackStyleTransparent'. You want the combo box to start off transparent so that you can see the text behind it.


Next, put in some VBA code to tell the combo box to change to be opaque when a value has been chosen. It will also need to change back to transparent if that value gets removed.

Private Sub cboProvince_Change()

If cboProvince.Value = Null Or cboProvince.Value = "" Then
cboProvince.BackStyle = fmBackStyleTransparent

Else

cboProvince.BackStyle = fmBackStyleOpaque

End If
End Sub

And there you have it! Please feel free to leave a comment or send me an e-mail if you have any questions.
Read More

Access: Linking Tables from SQL Server

Need to use data from SQL Server in your Microsoft Access database? You can do this using linked tables.

Go to the 'External Data' tab, and then click on 'ODBC Database' in the 'Import & Link' group. Select the 'Link to the data source by creating a linked table' option. Select your file data source, or click on the 'New' button to create a new one. You also have the option of going to the 'Machine Data Source' tab and using a data source that is specific to your machine. Everyone's network is going to be a bit different, so I'll leave that choice to you. Click on the 'OK' button when you've made your selection.

Next, you're going to see the 'Link Tables' list. Here you can click to select (or deselect) one or more tables. Choose the tables that you would like to link, and then click the 'OK' button.

You might have to select unique record identifiers for the tables as they are imported. If so, a box will come up with a list of the fields to choose from. This is just an extra step to ensure data integrity and to allow you to update records. You can choose up to ten fields.

When you're done, you will see your linked tables appear in the Navigation Pane. They will have a little globe icon, instead of the usual table icon.

Keep in mind that, by linking these tables, any data you change in Access will be updated in SQL Server, and vice versa. One nice thing is that you can rename the tables in Access without affecting the tables that they're linked to. This is especially handy if you're using naming conventions within Access that don't necessarily match what was done in SQL Server.
Read More

SharePoint: Create and Apply a Custom Theme to a Site

Today I'm going to tell you how to create your own customized theme for a Microsoft SharePoint site. The theme that you apply to a site affects the colours (or colors, if you're American) and fonts. There are a number of different themes that come out-of-the-box, but perhaps you're wanting a very specific look and feel.

The first step is to create an Office Theme file (*.thmx). Oddly enough, I'm going to ask you to ignore SharePoint for a moment and to open up Microsoft PowerPoint. With a blank presentation open, go to the 'Design' tab. There's a 'Themes' group there on the ribbon, and what you're going to want to do is to adjust the colours and fonts to your liking.

Click on the 'Colors' button, and then choose 'Create New Theme Colors...'. These are going to be the colours that you'll see used for various different elements throughout your SharePoint site. Change each one as desired, and then click the 'Save' button.

Next, click the 'Fonts' button, and then choose 'Create New Theme Fonts...'. Here is where you can choose the heading and body fonts for your site. Click the 'Save' button when you're done.

Now that you've chosen your colours and fonts, go to the 'File' tab and then click 'Save As'. In the 'Save as type' drop-down list, choose 'Office Theme (*.thmx)'. Give the file a name, and then save it somewhere on your computer.

It's time to head back to SharePoint and get the theme uploaded so that you can start using it. Keep in mind that you'll need the appropriate permission level to complete these next steps. Speak to your administrator if you aren't finding the menu items I'm about to describe.

In the upper left-hand corner of your screen, click on 'Site Actions', and then click 'Site Settings'. Click on 'Themes' (under 'Galleries'). Here you'll find a list of all of the themes in the system. Go to the very bottom and click 'Add new item'. Browse for your Office Theme file that you created, and then click the 'OK' button to upload it into the gallery.

The last step is to actually apply the theme to your site. Go back to 'Site Actions', and then click 'Site Settings'. Click on 'Site theme' (under 'Look and Feel'). In the list that appears, select the name of the theme that you created and uploaded, and then click the 'Apply' button. Wait a few moments for the changes to process, and you're done!
Read More