OneNote: Recover Accidentally Deleted Pages

Delete a page in OneNote by mistake? That's alright. OneNote 2010 has a new feature called the 'Notebook Recycle Bin' that allows you to retrieve pages that you'd previously discarded.

Go to the 'Share' tab on the ribbon, and choose 'Notebook Recycle Bin' in the 'History' group. Pages that you have deleted within the past 60 days will appear in this area, and you are free to restore them by right-clicking any page and choosing 'Move or Copy...'. Choose where you would like to place the page, click the 'Move' button, and there you go! It's as though you never deleted it.

What a relief, eh?
Read More

OneNote: Turn off the Calculator

Personally, I enjoy having a computer calculating mathematical equations for me. It's come to my attention, however, that the calculator feature in OneNote might actually be a bother for some of you! Luckily, there is a way to turn it off.

Go to the 'File' tab, and choose 'Options'. The OneNote Options window will come up. Choose 'Advanced' from the options on the left-hand side. In the first group of options, 'Editing', you will find a checkbox for 'Calculate mathematical expressions automatically'. Uncheck it, and press the 'OK' button.

You'll now be able to type in things like '1+1=', and the answer will remain a complete and total mystery.

My irrational fear of math makes it difficult for me to understand why you would want to turn off such a wonderful feature, but I hope this helps those of you who are wishing to do so!
Read More

Psssst! Students, here's a deal for you!

School's expensive enough on its own - don't let the high price of software get you down! Right now, students from eligible schools can get a copy of Microsoft Office Professional Academic 2010 for $89*.

89 bucks will get you Word, Excel, PowerPoint, Outlook, OneNote, Publisher and Access. It's perhaps obvious that I'm a fan of the entire suite, but I really must take this opportunity to highlight how fantastic OneNote is for students. I'm currently in university (part-time), and I really can't imagine how I'd get by without my OneNote digital notebooks. It's so easy to stay organized. And no, I'm not being paid to say this. I really just love OneNote.

Get your awesome software here. If that link doesn't work, let me know. The crazy Internet is always changing!

*That's Canadian dollars. Check the Web site and select your own country to find out how much it'll cost you if you don't live here, eh?
Read More

Outlook: "All Mail" Custom Search Folder

It’s great to keep your Outlook organized by sorting your mail messages into their own individual folders, but what if you just want to see all of your mail in one place? Creating a custom Search Folder will allow you to do this.

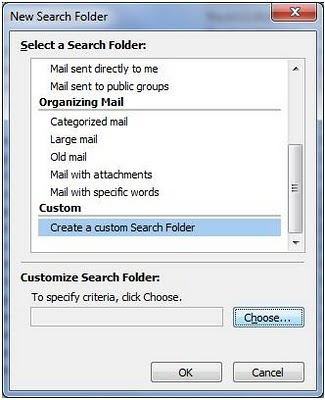
Go to the ‘Folder’ tab on the ribbon and click the ‘New Search Folder’ button in the ‘New’ group. In the window that pops up, scroll to the very bottom of the ‘Select a Search Folder’ list, and click on ‘Create a custom Search Folder’.


Click the ‘Choose’ button.

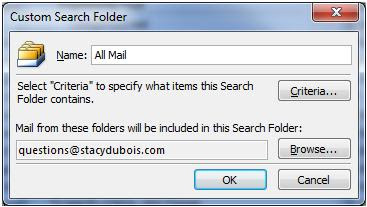
Type in a name for the folder. I like to call this one ‘All Mail’. Click the ‘Criteria…’ button.


Right now, this Search Folder will show absolutely every mail item in your Outlook. This sounds like what you’re wanting, but you actually want to make sure that anything in your Sent and Deleted Items folders don’t show up here. To do this, you need to set certain criteria.

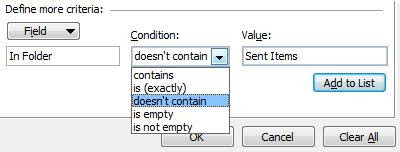
Click the ‘Advanced’ tab. In the ‘Define more criteria:’ section, click the ‘Field’ drop-down button and go to ‘All Mail Fields’, then choose ‘In Folder’. Under ‘Condition’, choose ‘doesn’t contain’. In the ‘Value’ text box, enter ‘Sent Items’. Click the ‘Add to List’ button. What you’ve just done is told Outlook that you don’t want it to display anything that is in the ‘Sent Items’ folder.


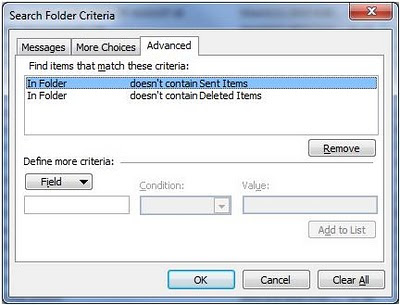
Repeat these steps to hide anything from the ‘Deleted Items’ folder. In the ‘Define more criteria:’ section, click the ‘Field’ drop-down button and go to ‘All Mail Fields’, then choose ‘In Folder’. Under ‘Condition’, choose ‘doesn’t contain’. In the ‘Value’ text box, enter ‘Deleted Items’. Click the ‘Add to List’ button.


Make sure you can see both criteria in the list, then click the ‘OK’ button.

You will be able to find your new custom Search Folder in the navigation pane under ‘Search Folders’. Keep in mind that nothing is actually stored in a Search Folder, it's just a different way of viewing items that are stored elsewhere.

Read More

Word: Stop Ruler from "Snapping"

Ever tried to set a tab or indent on the ruler in Word and become frustrated by it constantly snapping to predetermined intervals?

Get precise and fine-tune your adjustments on the ruler by holding down the Alt key on your keyboard while you move things around. This will allow you to set very specific tabs and indents without having the "snap to" feature get in your way.
Read More

Excel: How to Load the Solver Add-in

It's an Excel question this week!:

"I'm using Excel 2010. Where's the Solver Add-in?"

The Solver Add-in is included in the default installation of Excel 2010, so you probably don't need to worry about installing or purchasing anything extra. In order to use it for the first time, you need to load it.

Go to the 'File' tab, and choose 'Options'. Click 'Add-Ins', choose 'Excel Add-ins' (in the 'Manage' box), then click 'Go'. In the 'Add-Ins available' box, select the checkbox next to 'Solver Add-in'. If you don't see it in this list, you might need to click 'Browse' and find the location on your computer where it is stored.

Click 'OK' when you're done.

Now that it's been loaded, you can access the tool by going to the 'Data' tab. You'll find 'Solver' in the 'Analysis' group.

I hope this solved your problem! (I'm sorry, I couldn't resist the bad joke...)
Read More