Behavioural Advertising & How You Can Opt Out

Did you know that many of the advertisements that you see as you surf the Web have been customized for you, based on your online browsing habits? It's a somewhat interesting technique that marketers can use in an attempt to make their ads more meaningful to their audiences.

You've probably seen it happen to you as you click through various different sites. As an example, let's pretend that you search Google for "hockey tickets". Next, you decide to go and browse through a site showing strategies for the video game you're playing right now. An ad on the side of the page is showing you deals on tickets for the next hockey game in town. It's no coincidence - that's behavioural advertising at play.

While it's kind of nice to have custom-tailored content, it's no perfect science. Personally, I find that it has enough drawbacks that I have chosen to opt out of it from as many different advertising providers as possible. Here are a few reasons why you might not want to be targeted based on your online activity:
  • Your actual interests are not necessarily being communicated to advertisers. When someone searches for a certain set of terms, or visits certain pages, it doesn't necessarily mean that the content was personally relevant. One time, I was doing a school project on e-commerce. I researched some e-commerce service providers using Google, and visited a number of their pages. For the  next while, I suddenly noticed that one of those providers was constantly showing me ads on YouTube. I really don't care about e-commerce providers, but these companies now think that I do. Some of these advertisers will let you go in and update which categories of products or services interest you, but do you really want to have to spend your time doing that? I certainly don't.
  • It narrows your online experience. While it's true that advertisements are typically there in order to entice you to spend your money, there are definitely some personal benefits to being exposed to different things. If most of the ads that you see are based on your supposed interests, then you are missing out on the wider range of products and services that sit outside of your little bubble.
  • In a sense, it's a violation of your privacy. Do you really want advertisers to have access to a list of everything you've searched for and all of the sites you've been visiting? It's not necessarily an issue of super top secret data getting leaked, but more of a personal preference for privacy. Imagine if a person handing out flyers were to come up to you and then give you a flyer advertising a concert going on next week. Now imagine that the only reason that you got this particular flyer is because that person has been watching you go to record stores to buy new music, and has seen you buying a Rolling Stones t-shirt at the mall. That's a little invasive, don't you think? Behavioural advertising is more automated and doesn't involve an individual person stalking you like in my example, but it still makes me uncomfortable.
Okay, so how do they do it anyway? Many sites online update cookies stored on your computer. Google makes use of your browsing history stored within your account if you are logged in. This kind of data is used to help determine which ads should be shown to you.

These advertisers, for the most part, didn't do you the courtesy of asking you if it would be okay to gather insight on your browsing habits. What is nice, however, is that you do have the choice of opting out of many of them. Here are some links to help you opt out of some of the major ones:
Opting out doesn't block advertisements from appearing. It simply forces advertisers to push their ads to you based on factors such as the site that you are visiting rather than an analysis of your browsing habits. After opting out, you can feel better about your privacy and you will probably notice a much more diverse assortment of advertising content as you browse the Internet. Happy surfing!
Read More

SkyDrive Upgrade Announced


Exciting news from the crew over at Windows Live! In case you haven’t heard, SkyDrive has just been upgraded and it includes a whole pile of great new features. It’s no secret that I’m a huge fan of SkyDrive, as I have been using it for quite some time now to keep my Microsoft OneNote notebooks in sync with each other. This latest batch of updates is great though, and I urge you to check it out.

My favourite thing is that it is now considerably easier to manage your files on SkyDrive. They’ve beefed up the interface to make it a lot faster to add, move, and rename folders. I’ve found that interacting with my files used to be a bit cumbersome, but now it’s really slick. It’s always nice to see developers taking into account user feedback and improving the experience.

For all of the details straight from the Windows Live team, including screenshots and what seems to be a mostly positive stream of comments, check out the announcement on their blog.
Read More

5 Smart Ways to Use Your Smartphone

There’s a lot of criticism out there about smartphones, and how dependent some of us have become on these little gadgets. Certainly, I can agree that some of us use them pretty recklessly. I think we’ve all seen someone nearly walking out into traffic or smashing into someone on the sidewalk because their thumbs are busily typing out a tweet on their BlackBerry. Where I disagree with the critics, however, is that they seem to overlook just how much good these gizmos can do for us.

Here are 5 smart ways to use a smartphone that make life so much easier (in no particular order):

1 - Management of Personal Finances

When I'm at the grocery store and I'm wondering how much money I've spent in the past month, I don't have to rack my brain trying to figure it out. I just open up an app on my phone and can find out all of the details about my accounts within seconds. Using a smartphone to help manage your money makes it easier to keep on top of things. You can use it to remind you to pay bills, alert you if you are nearing your limit, or even to manage a budget.

2 - Research on the Run

Having a smartphone can help you, as a consumer, to make better buying decisions when you're out shopping. When I'm out at a store and wondering if the sale guy is really telling me the truth when he says that a product is a good deal, I pull out my smartphone and do some quick research. Within seconds, I can be reading reviews on the product, and comparing prices with other vendors. I've saved a lot of money and trouble just by having constant access to the Internet in my pocket.

3 - Mobile Library

My smartphone gives me the chance to do my readings even if I didn't bring my textbooks with me. Have PDF versions of books with you wherever you go, and you can pull them up for reading whenever you like. I’ve been getting ahead in my studies while I’m in line for a bank machine, while I’m waiting at the doctor’s office, and when I’m standing on the subway.

4 - Easier Navigation

If you’re like me and are always getting lost, then having a smartphone is a complete lifesaver. Getting around a new city or trying to find the nearest LCBO (that’s a liquor store, for you non-Ontarians) can be frustrating and sometimes impossible if you aren’t familiar with your surroundings. Smartphones with GPS navigation make it so much easier to find your way, and therefore can save you a lot of time.

5 - Remembering Important Dates

With the extensive calendaring features available on today's smartphones, you can rest assured that you won't miss any important dates. You can set up alerts to remind you about things like birthdays, anniversaries, and appointments. I find it especially useful with all of the different assignments I have to worry about for school. I don’t forget to complete anything thanks to my smartphone’s ability to keep track of it all for me.

So, there you have it. The next time you shake your head at someone with their eyes glued to the screen of their smartphone, consider the fact that they just might be doing something smart with it. Something smart like checking up to see how the Ottawa Senators are doing!
Read More

Excel: Change Text to Proper Case

Here's a handy function for you, if you ever find yourself with a a lot of data that isn't in the right case. The "PROPER" function in Excel will let you convert text into a format that capitalizes the first letter of every word, and makes the rest of the letters lowercase. I last used this when I was given a spreadsheet full of names that were in all caps, but I needed to use them in proper case for a mail merge.

So let's say that cell A1 contains the text "JOHN DOE". How do we get this to look like "John Doe"? In another cell, perhaps B1, put in this formula:

=PROPER(A1)

You'll see that it will take whatever is in cell A1 and convert it to proper case.
Read More

I'm Back, With New Ideas!

All apologies for my absence over the past few weeks! It's been a battle against what seems to have been the worst cold and sinus infection I've ever had. I certainly didn't have the energy to come up with anything interesting to post about, but I'm happy to say that I seem to be mostly back to normal. I'm even happier to say that, after a lot of thought, I've decided to move in a slightly different direction with my blog.

Here's the deal. While I'm a die-hard Microsoft Office fangirl, the fact is that I am very interested in the world of technology as a whole. That includes Microsoft Office, but it also goes past this area and touches on many other different products and systems. I've noticed myself increasingly wanting to post about different technology-related topics, but I didn't want to stray too far from the "Office Blog" that I've decided this would be.

I was just in Ottawa for the official launch of Skilled Trades and Technology Week in Canada at the Museum of Science and Technology in Ottawa, and so it seems like a great time to say that I will be sharing even more of my love for this exciting industry through my blog. Stay tuned for your usual dose of Microsoft Office tips and tricks, as well as a whole new batch of posts that explore an even more diverse assortment of topics.

Thank you to everyone for your continued support! When I originally started this blog, I never imagined I would end up with so many visitors. It's great to get your feedback through e-mails and comments, letting me know that I've been able to help out a lot of people. Cheers to you all.
Read More

PowerPoint: Turn Your Presentation Into a DVD

The other day I was asked about creating a DVD from a Microsoft PowerPoint presentation. There are a lot of different utilities online that can help you do this, but you don't need any extra tools if you're running PowerPoint 2010 on a Windows 7 machine. Here's how.

First, make sure that you have set up any timings, animation, or narration that you want in your presentation. PowerPoint has defaults that it will use for how fast it will transition between animations and slides, but you might want to go in and adjust the timings to better suit your content.

When you're ready, use PowerPoint to export your presentation to a video file format. Click here to find out how to do this.

Now, open up a program called Windows DVD Maker. If you don't know where it is, click on your Start menu and type in 'Windows DVD Maker'. You should see it appear in the list of programs in the Start menu.

If it's your first time using Windows DVD Maker, a wizard will appear. Follow the instructions on your screen and it will guide you through the entire process.

Click on the 'Add items' button, and choose the video that you have created from PowerPoint. At the bottom of the window, type in a title for your DVD.

If you click on the 'Options' link in the bottom right-hand corner, you can choose playback settings, the aspect ratio, the video format, and some additional settings for how you would like the disc to be burned. It is also in here that you can disable video filters.

When you are done, click the 'Next' button. If you have not changed your playback settings to exclude a menu, you will now see options for different styles of menus. You can choose one from the list on the right-hand side of the window, and then click the 'Menu Text' or 'Customize menu' buttons to further customize it. The 'Slide show' button is more for if you are adding photos to the DVD and you would like it to play them all in a slide show. Since we are working with a video, this won't be necessary.

When you have finished, you can use the 'Preview' button to make sure that everything is set up properly. Place a DVD in your disc drive, and then click the 'Burn' button.

There you go! From PowerPoint to a DVD, with no extra software or hassle.
Read More

Outlook: Disabling Add-Ins to Improve Performance

Is your Outlook being slow? One way to help improve the performance is to disable add-ins that you aren't using. When you startup Outlook, a number of add-ins load alongside the main application. These often are adding features that you might not even realize are available. It's nice, but it could be affecting your experience negatively depending on how powerful your computer is.

Try going through the list of add-ins and disabling those that you feel you won't need. To do this, go to the 'File' tab and click on 'Options'. From the options on the left-hand side of the window that appears, click on 'Add-Ins'. At the bottom now you should see a 'Manage:' combo box. Make sure that you have 'COM Add-ins' selected, and then click the 'Go...' button just next to it.

[For anyone that has the 'Developer' tab enabled on the ribbon, just go there and click on the 'COM Add-Ins' button - you'll end up with the same dialog box open.]

Now, you're going to see a list of add-ins with checkbox controls next to their names. Go ahead and scroll through this list and uncheck any add-ins that you would like to disable. As an example, I personally never make use of the social connector. I unchecked the box next to 'Microsoft Outlook Social Connector'. I also have disabled a number of different add-ins that are from third-party software applications that can integrate with Outlook.

When you have finished making your selections, click on the 'OK' button and restart your Outlook to see if your situation has improved at all. It could be that you won't notice much of a difference, or you might be missing features that you normally would use. Don't worry - if you want to get something back, just repeat the instructions in this post and put checkmarks next to add-ins to enable them once again. Everything is reversible!
Read More

Access: Export to E-mail

Here's a tip that will hopefully save you some time. The other day someone was talking to me about a report that they were pulling from Microsoft Access and saving as a PDF so that they could then e-mail it to someone.

That's two steps, though! If all you're looking to do is to send someone a report from your Access database by e-mail, then you should start using the Export to E-mail feature! When you have opened the report that you would like to send, go to the 'External Data' tab on the ribbon. Now click on the 'E-mail' button.

This lets you choose the output format, and then it conveniently opens up Microsoft Outlook and attaches it to a new message. All that is left to do is to enter the recipient(s), type a message, and click 'Send'! It's as simple as that.

Of course, if you're wanting to keep that exported file somewhere other than your 'Sent' folder, then perhaps this won't suit you. In any case, I hope this helps some other people!
Read More

OneNote: Password Protect Sections

Have some super secret stuff kept in a OneNote notebook? Me too. It would be really unfortunate if someone stumbled across all of my plans to take over the world and I'd forgotten to do something as simple as password protect it.

Right-click on any of the section tabs in your notebook, and then click on 'Password Protect This Section...'. A pane will appear on the right-hand side of your screen. Click on the 'Set Password...' button and then enter your password. Be careful when you are setting this - you won't be able to get back in if you've forgotten the password.
Read More

PowerPoint: Animation Painter

If you've applied an animation to an object in PowerPoint and you want the same effect to be applied to another object, consider trying out the Animation Painter! It's just like the Format Painter that you might already be familiar with.

First, select the object that has the animation that you would like to copy to another object. Then, go to the 'Animations' tab on the ribbon and click on 'Animation Painter' (in the 'Advanced Animation' group). Next, click on the object to which you would like to apply the animation.

Just like the Format Painter, you can also double-click on the Animation Painter button and then you are free to click on numerous other objects to apply the animation. When you are finished, click once on the Animation Painter button again or press the Esc key on your keyboard.

This can really make your life easier if you are working with a lot of different elements. Sometimes I find it time-consuming to go through the process of setting up each animation individually.
Read More

Windows 8: Ribbon for Windows Explorer

Remember how happy you were when the ribbon was introduced in Microsoft Office 2007? Well you will be able to relive the joy with the next release of Windows, according to their developers' blog on MSDN. They've been putting a lot of thought into Windows Explorer and have decided to revamp the interface and to include the ribbon.

Despite my sarcasm in that last paragraph, I have actually become a fan of the ribbon. I am convinced that, like the ribbon in Microsoft Office 2007, this will simply be something that I will hate at first but will eventually get used to and find more intuitive. It's just a matter of breaking old habits and making new ones, which is never easy to do.

In any case, I found the blog post to be very interesting. It's nearly as interesting as the inevitable debate that has erupted in the comments area. Check it out for yourself:

http://blogs.msdn.com/b/b8/archive/2011/08/29/improvements-in-windows-explorer.aspx
Read More

Access: SQL Server 2008 Date/Time Data Type Compatibility

I came across something annoying this week, and have decided to make a post here about it with the hopes that it can help someone else who might be experiencing the same thing!

Here's what happened. I have a Microsoft Access database that has a number of linked tables from a SQL Server 2008 database. I started to create an input form in Design view for one of these tables in Access. I added a date field that I'd chosen directly from the table, and then switched to Form view to try it out. I was annoyed to see that a date picker wasn't showing up for the date field. I switched back to Design view and checked all of the properties to make sure that it had been set up correctly (which it had), and then I double-checked the data type in SQL Server. I'd chosen 'DATE'. I checked in Access to see if it recognized this field as being a date, and it seemed to recognize it as such. The control on the form, though? It refused to act like a date.

The solution that I eventually found was to change the field in SQL Server to a DATETIME data type. I relinked the table in Access, and had no problem with the date picker on my form. I was curious to know why, though, and to make sure that this was actually the issue and not just something that I'd done wrong. I did a bit of research online and can confirm based on Microsoft's help content that four of the new date/time data types in SQL Server 2008 are only partially supported in Access 2010. These data types are as follows:
  • TIME
  • DATE
  • DATETIME2
  • DATETIMEOFFSET
What you'll find is that in Access, while the tables themselves recognize these data types and identify them as Date/Time fields, you will run into trouble when you try to use them on forms and reports. They will appear as text fields, meaning that you won't be able to apply date formats (without additional programming) or use the date picker.
Read More
I've been having all sorts of fun adventures working with a Microsoft Access database linked to SQL Server 2008 tables. And by "fun adventures", I really mean to say "irritating issues". Thankfully, I don't let them stop me... I just dig around until I can figure out how to get my way!

A bit field in one of my linked tables was showing up as a text box in forms. It was also showing up as text while viewing the table in Datasheet view. My first thought was, "Well this is completely useless. I don't want to see -1 and 0. I want a nice little checkbox!"

Generally, when you want to change a bit field (or in Access terms, a 'Yes/No' field) to display a checkbox control, it's easy enough to just go into the table design and make that change there. Yes, this is still the case for linked tables... but be forewarned that the UI in Access, for whatever reason, lies to you and attempts to trick you into thinking that you can't. Don't be fooled!

Right-click on the linked table that contains the bit field, and select 'Design View'. You're going to see the following message: "Table 'dbo_YourTable' is a linked table whose design can't be modified. If you want to add or remove fields or change their properties or data types, you must do so in the source database. Do you want to open it anyway?"

While this is mostly true, it fails to tell you that there are still some properties that you can alter that only really affect your Access file and that yes, you are free to make and save those changes here. Do yourself a favour and ignore this warning and proceed by clicking on the 'Yes' button.

Now, select your bit (Yes/No) field. At the bottom of the window in the 'Field Properties' area, click on the 'Lookup' tab. You're going to see a property called 'Display Control'. Change this to 'Check Box'. Now close the table, and click 'Yes' to save your changes.

It really is that simple. Unfortunately for me, this initially caused me grief because the warning was giving me the impression that I shouldn't even bother to try changing the table properties. Sheesh! Here's hoping that this post can help someone else (or several other people) save time.
Read More

Excel: Use VBA to Get Around Nested IF Statement Limitation

If you’ve ever used nested IF statements in Microsoft Excel, you might be aware of the fact that it is impossible to nest more the 7 functions in 2007 (or 64 in 2010 - thank you to 'danonuke' for enlightening me on this). What if you really need more than 7, though? Using VBA to create your own function to get around this limitation is actually fairly simple, even if you aren’t very familiar with programming in Excel.

If you are comfortable with VBA, then you’re going to want to scroll down and take a look at the code that I’ve posted. For those of you that are newer to the world of VBA, I’m going to explain how to do this in a series of steps.

For this example, pretend that you are a teacher who has to assign letter grades to a worksheet that contains all of the final marks of your students. Marks can be one of 11 different possibilities: A+, A, A-, B+, B, B-, C+, C, C-, D, or F.

With 11 different grades, using a nested IF statement might not work. In Excel 2007, you’d either have to simplify your marking scheme or completely leave out some ranges of marks. What we’re going to do is create what is called a user-defined function.

Not entirely sure what that means? Well, assuming you’ve used Excel to some extent, you probably already use some functions that Excel has already made for you. When you add up values using SUM, that’s a function. When you calculate an average using AVERAGE, that’s also a function. Using VBA, you can create your own functions which allow you to get the results you need.

First, you will need to save your workbook as a macro-enabled workbook. This is a special file format that specifically lets you use the functionality that we’re about to add using VBA. On the ribbon, click on ‘File’ and then choose ‘Save As’. In the ‘Save as type’ drop-down, choose ‘Excel Macro-Enabled Workbook (*.xlsm)’, and then click the ‘Save’ button.

Now, you need to open up the VBA editor window. On your keyboard, press Alt+F11. Go to ‘Insert’, and then click on ‘Module’. It is in this module that you are going to place your code.

Copy and paste the following code into the module (or type it out yourself, if you really feel like it):

Function GradePoint(Grade As Double)
Select Case Grade
Case 95 To 100
GradePoint = "A+"
Case 90 To 95
GradePoint = "A"
Case 85 To 90
GradePoint = "A-"
Case 80 To 85
GradePoint = "B+"
Case 75 To 80
GradePoint = "B"
Case 70 To 75
GradePoint = "B-"
Case 65 To 70
GradePoint = "C+"
Case 60 To 65
GradePoint = "C"
Case 55 To 60
GradePoint = "C-"
Case 50 To 55
GradePoint = "D"
Case 0 To 50
GradePoint = "F"
Case Else
GradePoint = "N/A"
End Select
End Function

When you’re done, close the VBA editor window (just click the x in the upper right-hand corner like any other window). Now you’re back on the spreadsheet.

At this point, you’re ready to use the function that you just created. Suppose that cell A3 has a student's final mark, which is 92.3. In cell A4, type in the following:

=GradePoint(A3)

You will now see the result “A” in cell A3.

Now, if this happens to be the exact scenario that you find yourself in, then you’re all set. However, it is likely that you are going to want to tweak this to suit your own needs. I’m going to explain a few things about the code that will hopefully make this task easier for you.

First of all, you can change the name of the function in the very first line. I have called it ‘GradePoint’. Go ahead and change this to something else if you like. This is the text that you are going to enter when using the function, so if you would rather enter something like ‘=EmployeeRating(A3)’, then change ‘GradePoint’ to ‘EmployeeRating’. Don’t just make this change in the first line, make sure you change it for every other instance of the term ‘GradePoint’ in the entire function.

You can go ahead and add or remove cases as you need to, and make changes to the numbers used in the different ranges. Think of the cases as different possible scenarios, and the item in quotation marks are the results that you would like to see in each scenario. In plain English, the first case is like saying “If the grade point is between 95 and 100, then the result is A+”.

The very last case you see, ‘Case Else’, is the result that is returned in the event that none of the other cases apply. It’s similar to the FALSE part of an IF statement. You’re going to want to leave this case to deal with anything unexpected. In my example, I’m showing ‘N/A’ for anything that isn’t between 0 and 100. That way, if I accidentally enter a mark such as 540 instead of 54, I will see ‘N/A’.

I hope that this post helps you out as you build your own function to get around the limitations of nested IF statements!
Read More
With only one essay left before finishing yet another university course I'm working on, I've found myself focusing quite intently on the statistics of my document. The word count seems to be just as important as getting the content together, as my deadline looms on the horizon.

You might already be aware that Microsoft Word displays your word count in the bottom left-hand corner of your screen (in the status bar). This total gets updated as you write, making it easy to continuously keep track of your progress. Did you know that you can access much more statistical information beyond the word count, though?

For those of you with other statistical needs, you should try going to the 'Review' tab of the ribbon, and clicking on the 'Word Count' button. I personally find this name to be a bit misleading, as you will find that this option brings up a window that displays a number of other statistics besides the word count: page count, character count (with and without spaces), paragraph count, and line count.

A checkbox right at the bottom allows you to specify whether or not to include the text found in textboxes, footnotes and endnotes. How awesome is that? The only complaint I have about this feature is that it doesn't allow you to keep the window open while you work... but it is just a click away, so it's not too much trouble to find when you need a status update.

Happy writing, and good luck to any fellow students that are in the process of pumping out papers!
Read More

Access: Select All Items in a List Box

Last week I was working on a Microsoft Access database I've been building and was making some changes to a form that allows users to select one or many items from a list box in order to set criteria for a report. By default, I wanted everything in the list box to be selected upon opening the form. Unfortunately there didn't seem to be a built-in "select all by default" option, so I put a little bit of code into the Form_Open event.

It did the trick for me, so I thought I'd share it with you today in case you're looking for the same thing:

Dim i As Integer

For i = 0 To Forms!frmFormName!lstListBoxName.ListCount - 1
Forms!frmFormName!lstListBoxName.Selected(i) = True
Next i

For the sake of any VBA beginners out there, I'll just remind you that you're going to want to change "frmFormName" to the name of your form, and "lstListBoxName" to the name of your list box.
Read More

Excel: Show Values for Empty Cells in PivotTable

Do you have a PivotChart in Microsoft Excel and you would like your empty cells to actually show something like "0" or "N/A" instead of being blank?

Right-click anywhere in the PivotTable and then click 'PivotTable Options'. Make sure you're in the 'Layout & Format' tab, and then place a checkmark next to 'For empty cells show:'. Use the text box just to the right to enter what you would like to appear for any empty cell. When you're done, press the 'OK' button to close the PivotTable Options window.

Your changes should go into effect right away.
Read More

OneNote: Change the Default Font

Yes, you can change the default font in Microsoft OneNote!

As nice as Calibri is, you might find that you would like to use a different font by default for your OneNote notebooks. You can change this quite easily by clicking on the 'File' menu on the ribbon, and then choosing 'Options'. The OneNote Options dialog box comes up, and you'll see the 'Default font' section here for you to alter if you so desire.
Read More

Access: Unhide Objects or Groups in Navigation Pane

I like to use custom groups to organize objects in my Microsoft Access databases. In any case, yesterday I decided that I no longer wanted to see one of those groups in the list, so I right-clicked it and chose 'Hide'. It was great! It disappeared completely from sight, and I was happy.

...happy until I realized that I wanted to see those objects again. Usually I don't have much trouble with this sort of thing, but I'm writing this post today because I found it particularly difficult to unhide that group. Something tells me I'm not the only person who has experienced this frustration.

If you want to unhide those objects/groups, what you first are going to want to do is to configure your navigation settings to show hidden objects. Go to the 'File' tab on the ribbon, and select 'Options'. You should be on the 'Current Database' tab by default. Just one section down, you'll find 'Navigation'. Click on the 'Navigation Options...' button. Next, select the 'Show Hidden Objects' checkbox (in the bottom left-hand corner). Press 'OK' twice to confirm, and now you'll see anything that you've hidden in your navigation pane. Hidden items are dimmed, so you can easily spot them.

Now you are free to right-click and 'Unhide' anything you like. When you're done, you're probably going to want to go and uncheck that checkbox to make sure that hidden stuff stays hidden again. Your choice, though!

Hopefully this will save someone the time that I spent trying to figure this out. Until next time... have a great day!
Read More

Excel: Format Phone Numbers with Brackets and Hyphens

This week I bring you the solution to a problem that was brought to me by someone very frustrated in dealing with a Microsoft Excel spreadsheet full of phone numbers. She was looking to use the phone numbers to create a directory using the mail merge feature in Microsoft Word. Unfortunately, the phone numbers were all formatted incorrectly for what she needed. Every number appeared without any brackets or hyphens.

She had numbers like this: 5555558173
But wanted numbers like this: (555) 555-8173

You can have Excel add in those brackets and hyphens automatically. You will want to use a combination of CONCATENATE, LEFT, MID, RIGHT, and TRIM.

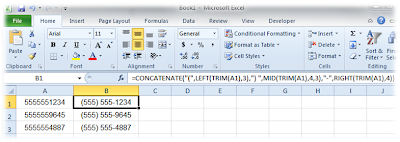
For this example, I'm assuming that your first phone number is in cell A1, and you would like it to be formatted correctly and appear in cell B1. In cell B1, you are going to want to enter the following formula:

=CONCATENATE("(",LEFT(TRIM(A1),3),") ",MID(TRIM(A1),4,3),"-",RIGHT(TRIM(A1),4))

Here's a screenshot of what it will look like (click to view a larger version):


That's it! Of course, this is for the specific style of phone numbers that we use here in North America. You might very well need to adjust your concatenate formula if you are using a different format.

Not quite sure how concatenation works? Click here to read a previous post I made, which should help clear up any confusion you might have on the topic.
Read More

Excel: Prevent Printing of Specific Objects

Sometimes there's stuff that you want displayed on screen while using a Microsoft Excel spreadsheet, but you don't want it appearing on printouts.

For example, I use a budgeting spreadsheet that has a number of text boxes with reference text for use while filling in information. I don't want all of that to show up when I print out the budget, though. I also don't want to have to move them outside of the print area, or perhaps delete them temporarily.

Objects such as text boxes, shapes, and pictures all have a setting which dictates whether or not it will print. By default, objects will print. You can go in and change this.

First, you need to bring up the properties. If it's a text box or other shape, right-click it and select 'Format Shape...'. If it's an image, right-click it and select 'Format Picture...'.

From the options on the left-hand side, choose 'Properties' (it's the third from the bottom). Uncheck the checkbox next to 'Print object'. Click the 'Close' button when you're done.

If you ever want the object(s) to print once more, simply repeat those steps and place a checkmark back in that same checkbox.
Read More

Excel: Show Initial Text in Combo Box Control ('Select One')

Want to see some initial guiding text such as 'Select one' for a combo box? You'll see some people suggesting that you add that as an additional list item, but I don't really like that approach. It's a bit sloppy because in reality, it's not really an item in the list. You don't want the user to choose "Select one". You want them to actually follow the instructions and make a choice, right?

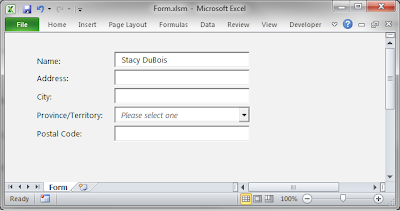
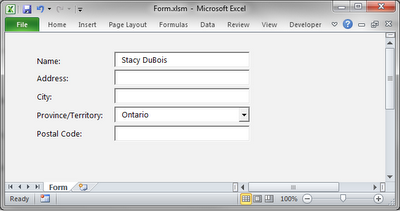
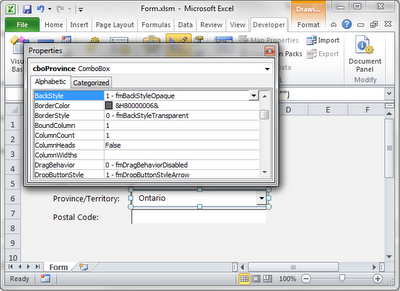
As with most things in Microsoft Excel, there are a number of different approaches for seeing the same results, but I'm going to show you the way that I like to do this. I've made a very basic little form so that you can see how it looks. Take a look at the combo box for 'Province/Territory'. See how it says 'Please select one'?


Now, see how that text becomes invisible once you make a selection?


When the user clears the text from the combo box, the 'Select one' text will appear once more, as in the first image.

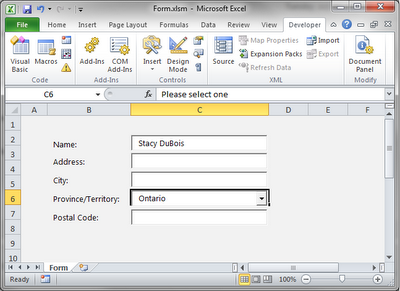
First what you're going to want to do is enter your 'Select one' text into the cell that is directly behind the control. In my case, I've put it in cell C6. Due to the way I've styled this particular form, I've also given that cell a white fill to match the controls. If you haven't sized everything to follow the rows and columns, you might need to actually put this in as a text box behind the combo box. Whatever works best for you will be okay.


Now, make sure the BackStyle property of your combo box is set to '1 - fmBackStyleTransparent'. You want the combo box to start off transparent so that you can see the text behind it.


Next, put in some VBA code to tell the combo box to change to be opaque when a value has been chosen. It will also need to change back to transparent if that value gets removed.

Private Sub cboProvince_Change()

If cboProvince.Value = Null Or cboProvince.Value = "" Then
cboProvince.BackStyle = fmBackStyleTransparent

Else

cboProvince.BackStyle = fmBackStyleOpaque

End If
End Sub

And there you have it! Please feel free to leave a comment or send me an e-mail if you have any questions.
Read More

Access: Linking Tables from SQL Server

Need to use data from SQL Server in your Microsoft Access database? You can do this using linked tables.

Go to the 'External Data' tab, and then click on 'ODBC Database' in the 'Import & Link' group. Select the 'Link to the data source by creating a linked table' option. Select your file data source, or click on the 'New' button to create a new one. You also have the option of going to the 'Machine Data Source' tab and using a data source that is specific to your machine. Everyone's network is going to be a bit different, so I'll leave that choice to you. Click on the 'OK' button when you've made your selection.

Next, you're going to see the 'Link Tables' list. Here you can click to select (or deselect) one or more tables. Choose the tables that you would like to link, and then click the 'OK' button.

You might have to select unique record identifiers for the tables as they are imported. If so, a box will come up with a list of the fields to choose from. This is just an extra step to ensure data integrity and to allow you to update records. You can choose up to ten fields.

When you're done, you will see your linked tables appear in the Navigation Pane. They will have a little globe icon, instead of the usual table icon.

Keep in mind that, by linking these tables, any data you change in Access will be updated in SQL Server, and vice versa. One nice thing is that you can rename the tables in Access without affecting the tables that they're linked to. This is especially handy if you're using naming conventions within Access that don't necessarily match what was done in SQL Server.
Read More

SharePoint: Create and Apply a Custom Theme to a Site

Today I'm going to tell you how to create your own customized theme for a Microsoft SharePoint site. The theme that you apply to a site affects the colours (or colors, if you're American) and fonts. There are a number of different themes that come out-of-the-box, but perhaps you're wanting a very specific look and feel.

The first step is to create an Office Theme file (*.thmx). Oddly enough, I'm going to ask you to ignore SharePoint for a moment and to open up Microsoft PowerPoint. With a blank presentation open, go to the 'Design' tab. There's a 'Themes' group there on the ribbon, and what you're going to want to do is to adjust the colours and fonts to your liking.

Click on the 'Colors' button, and then choose 'Create New Theme Colors...'. These are going to be the colours that you'll see used for various different elements throughout your SharePoint site. Change each one as desired, and then click the 'Save' button.

Next, click the 'Fonts' button, and then choose 'Create New Theme Fonts...'. Here is where you can choose the heading and body fonts for your site. Click the 'Save' button when you're done.

Now that you've chosen your colours and fonts, go to the 'File' tab and then click 'Save As'. In the 'Save as type' drop-down list, choose 'Office Theme (*.thmx)'. Give the file a name, and then save it somewhere on your computer.

It's time to head back to SharePoint and get the theme uploaded so that you can start using it. Keep in mind that you'll need the appropriate permission level to complete these next steps. Speak to your administrator if you aren't finding the menu items I'm about to describe.

In the upper left-hand corner of your screen, click on 'Site Actions', and then click 'Site Settings'. Click on 'Themes' (under 'Galleries'). Here you'll find a list of all of the themes in the system. Go to the very bottom and click 'Add new item'. Browse for your Office Theme file that you created, and then click the 'OK' button to upload it into the gallery.

The last step is to actually apply the theme to your site. Go back to 'Site Actions', and then click 'Site Settings'. Click on 'Site theme' (under 'Look and Feel'). In the list that appears, select the name of the theme that you created and uploaded, and then click the 'Apply' button. Wait a few moments for the changes to process, and you're done!
Read More

Excel: Change the Default Number of Worksheets

Personally, I don't like having Excel create three worksheets for me every time I make a new workbook. It seems like a random number, and I quite often either need more or less. I've set Microsoft Excel to default to only create one worksheet when I make a new workbook.

Here's how you can change this on your own computer, so that Excel will open however many sheets you want. Go to the 'File' tab, and click on 'Options'. Now look in the 'When creating new workbooks' section, and you'll see there's a 'Include this many sheets' option. This is where you can type in any number between 1 and 255. Click the 'OK' button when you've finished, and you're all set! The next time you create a new workbook, Excel will put in the number of sheets that you specified here in your Excel Options.
Read More

Word: Tab Key Not Changing Levels in Multilevel Lists

Working with a multilevel list in Microsoft Word and your tab key isn’t allowing you to change list levels the way you’d like it to? It’s a frustrating problem, with a solution that is thankfully quite simple.

Go to the ‘File’ tab, and click on ‘Options’. From the list on the left, choose ‘Proofing’. Now, under ‘AutoCorrect options’, click on the ‘AutoCorrect Options…’ button. In the window which appears, click on the ‘AutoFormat As You Type’ tab. Select the ‘Set left- and first-indent with tabs and backspaces’ checkbox. Press the ‘OK’ button twice, and you’re done!
Read More

Outlook: Export Contacts List

In this post I'm going to let you know how you can export your Contacts list in Microsoft Outlook. There are many different reasons why you might want to do so. It might be that you need to share the contacts with someone else, or that you are wanting to import them into another application.

Start by clicking on the 'File' tab on the ribbon in Outlook, and choosing 'Open'. Now, click on the 'Import' button.

As a side note, yes... I realize these steps seem bizarre, given that you are wanting to export and not import. It doesn't really make sense to me either, but it works.

The 'Import and Export Wizard' window will appear. From the list, choose 'Export to a file', and then click the 'Next' button.

Now, you need to decide which kind of file you would like to export. The one that you want depends entirely on what you are using it for. As an example, I would select Microsoft Excel 97-2003 if I wanted to open the list in Excel. Figure out which type of file you need and choose it from the list, and then click the 'Next' button.

The next list you will see appear shows all of the different folders you have in your Outlook. Click on the Contacts list you wish to export (if it's the default one, just click 'Contacts'). Click the 'Next' button.

Next, click the 'Browse' button to choose a name and location for the file you are exporting. For example, you could navigate to your Desktop and name it 'Exported Contacts'. When you're ready, click the 'OK' button and then the 'Next' button.

The last step is just to confirm your export. If you're ready to proceed, click the 'Finish' button.

After everything is done, you will see your exported file in the save location that you chose. It's important to note that this doesn't remove those contacts from your list, but is simply a copy of them in the format of your choosing. If your intention was to also remove the contacts from your Outlook, you'll need to go into Outlook and delete the contacts after exporting them.
Read More

OneNote: Keep Notebooks Synchronized Across Multiple Devices

Addicted to Microsoft OneNote? I sure am. As someone who uses a number of different computers both at home, at work, and on the road, I rely quite heavily on my OneNote notebook to keep things organized.

From a student perspective, I have often found it frustrating in the past that I had to lug all of my notes around with me. Any electronic files needed to be saved to a memory stick or crudely e-mailed to myself in an attempt to ensure that I had access to them wherever I went. Thankfully, technology has reached a point where this is no longer an issue.

Say hello to Windows Live SkyDrive, your best friend when it comes to securely synchronizing your OneNote notebooks across a number of devices. With my current setup, and at no extra cost, I can access my notes from any computer that has Internet access. It doesn’t even have to have OneNote 2010 installed!

How did I do it? First, make sure you have a Windows Live ID. If you don’t have one, go to http://www.live.com and register for an account.

Next, open up your notebook in OneNote 2010. Click on the ‘File’ tab on the ribbon, and choose ‘Share’. Click on the notebook you want to save, and then click ‘Web’. Next, click ‘Sign In’ and enter your credentials to log into your Windows Live account. Select the folder in your SkyDrive to which you would like to save the notebook, then click ‘Share Notebook’.

Once everything has been uploaded, you’re free to access your notebook from other computers. Open a Web browser and go to http://www.skydrive.com. Once you’ve logged in to your account using your Windows Live ID, navigate to the folder in which you store the OneNote notebook.

Hover your mouse over the notebook in SkyDrive, and you will be presented with a few different options. Click on ‘Edit in browser’ to open up the notebook right in your Web browser. This will allow you to view and edit the notebook within the Web browser, even if the computer you’re on doesn’t have OneNote 2010 installed. Alternatively, you can click on ‘Open in OneNote’ to use the OneNote application on your computer to view it and to make changes.

I just love being able to do this. I can be on my netbook at the library making changes to my notes, and then easily open up the same notebook at a friend’s house who doesn’t even have OneNote 2010. It also gives me some peace of mind knowing that my files are backed up on the Web*. Give it a try today and see how neatly OneNote integrates with SkyDrive.

*I would like to point out that backing up your files is a very important thing to do! I back my files up online and I also have an external hard drive which automatically backs everything up from my computers. The effort that you put into protecting your data will be quite worth it should any mishaps occur. If you aren’t currently taking any measures to back up your data, I highly recommend that you put some thought into it.
Read More

Excel: Week Number Function

Following my post on showing week numbers in Microsoft Outlook calendars, a couple of people e-mailed me questions about how to access week numbers in Microsoft Excel.

The function to use in order to get the week number for a given date is WEEKNUM. For example, if cell A1 contains the date “10/19/2011”, the following formula would return “43”, indicating that it is the 43rd week of the year:

=WEEKNUM(A1)

There is an additional optional parameter, “return type”, which is used to specify the day of the week that marks the beginning of a week. For example, use “12” if you’d like the weeks to start on Tuesdays:

=WEEKNUM(A1,12)

The following is a list of the various return types and their corresponding days. You’ll notice there are some duplicates – they aren’t typos, I assure you!

1: Sunday
2: Monday
11: Monday
12: Tuesday
13: Wednesday
14: Thursday
15: Friday
16: Saturday
17: Sunday
21: Monday
Read More

Outlook: Add Week Numbers to Your Calendar

Some of us work with week numbers, something which doesn’t appear by default on calendars in Microsoft Outlook. The nice thing is that you do have the option of having these week numbers appear, both in the month view and in the Date Navigator. That means you no longer need to dig out the paper calendar and manually write in each week number for the whole year (what a pain!).

First, click on the ‘File’ tab on the ribbon. Choose ‘Options’. On the left-hand side of the Outlook Options window which will appear, choose ‘Calendar’. Now look under the ‘Display Options’ header and you’ll find a check box labelled ‘Show week numbers in the month view and in the Date Navigator’. Put a checkmark in that box and you’ll see the week numbers showing up on your calendar.

Removing the week numbers is as simple as repeating the above instructions, but clearing the checkbox.
Read More

Outlook: Add Regional Holidays to your Calendar

Someone recently was talking to me about their calendar in Microsoft Outlook, and pointed out that "it sure is annoying that it only shows American holidays". I was happy to tell her how she can get Canadian holidays (or holidays from just about anywhere else) on her calendar without manually entering them all, and I figured I'd make a post here to tell everyone else how easy it is too!

First, go to 'File', and then choose 'Options'. On the list to the left of the Outlook Options window which will pop up, choose 'Calendar'. Now look for the 'Calendar options' heading. Under this, click the 'Add Holidays...' button. A dialog box will appear, allowing you to choose one or more locations. When you click 'OK', holidays will be imported into your calendar. It's that simple!
Read More

PowerPoint: Arrange Objects Using the Ruler, Gridlines, and Guides

Lining things up in PowerPoint doesn't have to be a hassle. While there are many different features to help you arrange things, sometimes it's easiest to have visual cues on screen to help you place objects more efficiently.

By default, you won't see the ruler, gridlines, or guides. You'll need to turn these on manually by going to the 'View' tab on the ribbon. Look in the 'Show' group, and you'll find three checkboxes to turn on (or off) the ruler, gridlines, and guides.

What's nice about the ruler is that a little dotted line appears on both the horizontal and vertical rulers to help you pinpoint the exact location of your cursor.

If you're looking to actually see a grid over the slide, then you'll want to show the gridlines. Don't like the size of the grid? If you click the little icon in bottom right-hand corner of the 'Show' group on the 'View' tab of the ribbon, you'll open the Grids and Guides dialog box which allows you to adjust the spacing of the grid.

I'm personally a big fan of the guides, which allow you to position a horizontal and vertical line exactly where you need them. You can click and drag to move them, and its position on the ruler appears as you reposition it to help you be more accurate.

Guides and gridlines do not display when viewing a presentation, nor do they print. If you want something similar to be shown on your slides, you'll need to actually build them as objects.

As always, I invite you to stay tuned for future posts about setting up snazzy-looking presentations! I'm currently toying with the idea of creating some videos to demonstrate how to work with objects in PowerPoint, so be sure to visit my site again if that sort of thing is of interest to you. In the meantime, have a great day!
Read More

Windows 7: Show Clocks in Different Time Zones

I'll always remember the first time I saw one of those walls in an airport that has a pile of different clocks lined up, each showing the current times in different cities around the world. At the time it was just really novel to see so many clocks in one place with different times, but I was too young to really see the usefulness of it. Now that I'm regularly in contact with people in different time zones, I'm seeing how handy it is to have my own set of clocks. Did you know that you can have your own set of three clocks using Windows 7?

The first clock is going to be your system's time, so that will need to be your own time zone. You can add up to two more clocks, however, which you can see anytime you hover over or click on the clock on your taskbar. Add these additional clocks by first clicking on the clock and then clicking on the 'Change date and time settings...' link. In the Date and Time window which will then appear, click the 'Additional Clocks' tab. Check one or both of the 'Show this clock' checkboxes, and then you can go ahead and select the time zone that you would like to display. There's also a text box there for each that lets you give it a display name. You could put the name of the region, or perhaps the name of the person that you know in that time zone. When you're done, click the 'OK' button. Hover your mouse over the time now and you'll see your additional clock(s). Cool, eh?
Read More

Access: Export Report as PDF

Microsoft Access has a built-in feature that allows you to export a report in PDF format. What you need to do is click the ‘PDF or XPS’ button on the ribbon. You’ll find this button in slightly different places depending on how you’re viewing the report. If you’re in Report mode, you’ll find it on the ‘External Data’ tab. If you’re in Print Preview mode, you’ll find it on the one and only tab available - ‘Print Preview’. Once you’ve clicked the button, you’ll be able to choose a file name and location, and Access will generate and save the PDF for you when you click the ‘Publish’ button.

If you only want to publish a certain page rage and not export the entire report, click the ‘Options’ button just before clicking ‘Publish’. Select the ‘Page(s)’ radio button and enter the ‘From’ and ‘To’ page numbers, and then press the ‘OK’ button.
Read More

Access: Change the Default Folder

When you first install Microsoft Access, it makes an assumption about where you’d like to save your databases when you first create them. If you’re using Windows 7, you’re likely to find that it’s defaulted to your user ‘Documents’ folder. If you have a different location you’d rather it default to, however, that can be changed.

It doesn’t matter if you have a database open or not, but you’ll need to have the Access application open. Go to the ‘File’ tab on the ribbon, and choose ‘Options’. If it’s not already selected, make sure you have the ‘General’ button pressed (from the options on the left-hand side of the window). In the ‘Creating Databases’ section, you can enter a new file path for your default save location next to ‘Default database folder:’. Click the ‘Browse…’ button if you’d like to navigate to it instead of entering it manually. When you’re done, press the ‘OK’ button.

It’s important to note that this doesn’t change the location of any databases you’ve already created; it simply changes the default for any that you create from this point forward.
Read More

OneNote: Optional Update Released 2011/03/14

Attention all Microsoft OneNote users: a free and optional update was released for us today, for both 32-bit and 64-bit versions. According to the Microsoft OneNote blog, the update "improves the display of search results and inserted documents and improves Optical Character Recognition (OCR) and indexing features in the application".

Click here to be redirected to the Microsoft site for more information and a download link.
Read More

Excel: Find Duplicates

The built-in Microsoft Excel feature to remove duplicates from a set of data is great, but what if you just want to find the duplicates and not actually remove them?

You can use Conditional Formatting to have Excel automatically find duplicates and highlight them for you. First, select the cells in which you’d like to find duplicate values. In most cases this is going to be entire rows or columns. Next, click the ‘Conditional Formatting’ button on the ‘Home’ tab of the ribbon. Go to ‘Highlight Cells Rules’, and then choose ‘Duplicate Values…’.

The ‘Duplicate Values’ window will come up, which allows you to make a couple of choices. First, choose ‘Duplicate’ or ‘Unique’ from the drop-down list. The next drop-down list lets you choose how you’d like the value to be marked. There are some preset options available to you, or you can choose ‘Custom Format…’ and set your own. When you’re done, click the ‘OK’ button and you’ll see that Excel has gone through and formatted the unique or duplicate values in the format that you have chosen.
Read More

Access: Cancel Opening Report if No Data

There’s hardly any point in opening a report if it has no data to display, so how do you get your Microsoft Access database to just let you know that there’s nothing there and to not bother opening it? The answer is all about the On No Data event.

With the report open in Design View, go to the Property Sheet. If the Property Sheet isn’t already open, you can access it by clicking the ‘Property Sheet’ button on the ‘Design’ tab of the ribbon. From the ‘Selection type' drop-down list at the very top, make sure you have ‘Report’ selected. Now go to the ‘Event’ tab. Click next to where it says ‘On No Data’ and then click the ellipsis button (…) which will appear just to the right-hand side. In the window which pops up, choose ‘Code Builder’, and then press the ‘OK’ button.

Now you’re in the VBA editor, where it has already set up a subroutine for you called Report_NoData. The code you enter here will run when you open a report and there is no data to be displayed. If you’re comfortable with VBA, you can go ahead and put whatever you like in here. Here’s what I use to make a simple dialog box come up to inform the user that the report is empty, and to then cancel the opening of the report:

Private Sub Report_NoData(Cancel As Integer)

     message = MsgBox("There is no data available for this report.", vbOKOnly, "No Data Available")
     Cancel = True

End Sub

When you’re done, you can save and close the VBA editor window and the report. The next time you try to view the report and there’s no data to display, this handy bit of code you entered will prevent you from seeing a pile of errors and an empty report.
Read More

Dear Readers

I'm quite complimented that some of you have noticed I haven't posted as I normally do this week. I figured it would be best to let everyone know here that I'm in the middle of preparing for an exam that I'm writing this coming weekend, so I most likely will not be creating another entry for this blog until after I've finished. While it would be quite feasible for me to throw something together really quickly, I'd rather wait until I have the time and energy to put together a post of good quality. Until then, I hope all of you are having a wonderful day and please continue to send me e-mails with your comments and questions - I love getting them!
Read More

Access: Change the Tab Order on a Form

So you've created a form in Microsoft Access and everything seems to be laid out perfectly... but wait! Why does your cursor jump around to the different fields in an awkward order when you press the Tab key? Is there a way to change that?

Changing the tab order on a form is actually a fairly painless process. From the design view, click on the 'Design' tab on the ribbon (it's in the 'Form Design Tools' group). To the very right of the ribbon, click on the 'Tab Order' button.

The 'Tab Order' window now appears. You'll have some different sections on the left-hand side of the window, depending on what you've included in your form design. Things you might see here include: Form Header, Page Header, Detail, Page Footer, and Form Footer. Each section of the form has its own tab order, so you'll want to first select the appropriate section. Chances are, you're looking to change the tab order in the 'Detail' section.

Once you've selected a section, take a look at the right-hand side of the window. Here you're going to see a list of all of the objects that you can jump to using the Tab key. Click the box to the left of an item to select it. If you drag while clicking, you can select multiple items at once. When you've finished making your selection, click once more and drag to move the item(s) up or down in the list. Rearrange it as you please, then click the 'OK' button to finish.

Besides manually reordering these items, you can click the 'Auto Order' button on the 'Tab Order' window, and Microsoft Access will try and guess a good order for you automatically. I find this option works fairly well if you've organized your form in a standard manner and haven't gotten too creative.

And there you have it! Hope this helps some of you out as you design your forms.
Read More

SharePoint: Fix Slow Browsing in Windows Explorer

I came across a surprising fix to a problem I was having today, and thought I'd share it here on my site. While using Windows 7 and browsing through various folders in SharePoint with Windows Explorer, everything was loading at a sickeningly slow pace. Super, extremely, verrrrrrrrrrrrrry slow.

Oddly enough, you can make it run fast by changing some settings in Internet Explorer. You need to make sure you make these changes in IE regardless of whichever other browser you may use, as it is heavily integrated with Windows Explorer.

Open IE, go to 'Tools', and then choose 'Internet Options'. Go to the 'Connections' tab, and then click the 'LAN settings' button (it's right near the bottom). Uncheck the box next to 'Automatically detect settings'. Click 'OK' twice and you're all set.

If I had more of a networking background, I'd offer you an explanation as for why this works... but in the meantime, I hope that this helps out some of you out there who have been experiencing the same frustration as me!

(Consider this an open invitation to leave a comment if you know why this works. I offer my eternal gratitude in return.)

***April 12, 2012 Update: Check out the comments below - someone has been kind enough to explain it all. Fantastic.***
Read More

Outlook: Block E-mail Addresses

Someone sending you messages that you don't feel like reading in your inbox? Microsoft Outlook lets you maintain a list of blocked addresses that will prevent those e-mails from getting through.

Right-click on a message from the sender you wish to block, and go to 'Junk', then choose 'Block Sender'. A message will come up to confirm that the sender has been added to your Blocked Senders List. Press the 'OK' button.

To unblock an address, right-click on any message in your inbox and go to 'Junk', then choose 'Junk E-mail Options'. In the window that appears, go to the 'Blocked Senders' tab. It's here that you can view the list of e-mail addresses you have blocked, and can select one and press the 'Remove' button (just to the right of the list). If you want, you can also add addresses to the list here by clicking the 'Add...' button.

Messages from blocked senders are automatically moved to your Junk E-Mail folder, so you're always free to retrieve them from there if you've made a mistake.
Read More

Stacy's Top 9 Favourite Things About Microsoft Excel

Any hardcore Microsoft Excel fans out there will already have caught wind of this, but for the rest of you out there: did you know that Microsoft Excel has been around for 25 years now? Amazing!

In honour of this milestone, I decided it would be the perfect time to make a post about my top 9 favourite things about Microsoft Excel. Why 9? Why not 10? Well, 9 is my favourite number.

In no particular order:

#1: Excel lets me keep data in my spreadsheet up-to-date by pulling information from Web queries, Access databases, other workbooks, and a number of other external sources. I don't have to spend extra time manually updating numbers - Excel does it for me!

#2: Pivot Tables and Pivot Charts. These powerful data manipulation tools leave me wondering how awful it must have been to work with information before computers. In a matter of seconds, I can create a meaningful report or chart on thousands of rows of data.I can use Excel for my personal life outside of the office. It's great for planning my budget, keeping track of fitness goals, and even making portion changes to my favourite recipes. I'd choose Excel over a paper and calculator any day.

#3: Built-in error checking spots potential problems that I would have otherwise missed. It's nice to know that if I do something like accidentally omit a cell from a calculation that Excel will point it out to me and I can fix it right away.

#4: There's an impressive array of functions available to use for just about anything you could possibly want to do... and you're free to create your own using VBA if you need something more customized.

#5: Excel integrates so well with the rest of the Microsoft Office suite. For example, I love that I can copy part of a spreadsheet into a Word document and have it stay up-to-date if I go back and make changes to the spreadsheet.

#6: I can make annotations to a spreadsheet using a tablet PC or my graphics tablet. Sometimes you just want to be able to circle things or make written notes. Excel lets you do all of this without printing anything out!

#7: I can view and make changes to my spreadsheet at the same time as the rest of my team without having to manage multiple copies and then somehow merge them when I'm done. Using Excel through SharePoint makes it possible for everyone to be working on the same file at once.

#8: Conditional formatting makes it quick and easy to highlight items in a spreadsheet that meet certain criteria. One time I needed to spot a number of items in a massive file that were above a certain value. Using conditional formatting, I was able to very quickly spot these values. It would have taken me hours to go through it all without this tool!

#9: Lastly, there's such a large number of resources out there on the Internet to help you use Excel. Besides my site here, you can find help topics on just about anything you want to accomplish on the Internet. With such a wide community of users and great technical support out there, you can use Excel with confidence and know that you can always get the help you need if you look for it.

And there you have it, my friends! Of course, this isn't an exhaustive list of everything I love about Excel... but I certainly don't have the time to explain everything in detail. I'll save some of that for future posts.

Happy 25th, Microsoft Excel! From your #1 Canadian fan, Stacy DuBois.
Read More